
 Français
We can find the specifications of this router here : https://wikidevi.com/wiki/Linksys_WRT350N_v2. This is an old WiFi router released before 2010 but it could be interesting in many case due thanks to its USB port especially for using it as a 4G modem using phone tethering.
Stock firmware does not let this old router a lot of possible use but with an OpenWRT firmware, features that let us revive this equipment are numerous : NAS, tethering 4G, customizing firewall, etc. All information about how to install this firmware on this router can be found on the page of the WRT350N V2 on OpenWRT website.
The firmware OpenWRT that is officially compatible can be found here : Attitude Adjustment 12.09. I had used this firmware during several years and I’m fully satisfied of it. As this materiel is now a little old, you could find on this web page a copy of all the files of this OpenWRT release.
A more recent project exists and aim to go on supporting the WRT350NV2 on OpenWRT and LEDE. We can find it here.
The last stock firmware Linksys for this router can be found here. A copy of the archive can be found on this web page.
Bricking 🙁
When playing with firmware, mistakes are possible and you can brick your router. DO IT AT YOUR OWN RISK !
If your router does not come back in rescue TFTP mode on if it does not lit any leds, you probably bricked it as me by playing in the flash memory where you do not have to. The more sensitive part of the memory is the bootloader (U-Boot) and some key strings (ErCoMm read OpenWRT WRT350NV2 page).
In the case of the Linksys WRT350NV2, thanks to the work of DirkNL, Maddes.b, StrickerNL and Relghuar on the forum of OpenWRT, if you make a mistake it is possible to revive it using a low level interface named JTAG : https://forum.archive.openwrt.org/viewtopic.php?id=12358&p=42 (post #1031). As this thread is old, some links and pages are dead so I spent a lot of time collecting informtaions (many many thanks to DirkNL for his archives) for reviving my WRT350NV2. This is for what I will try to redo a full HOWTO here.
Debricking 🙂
Debricking this unit is not possible directly by flashing image into flash memory using a JTAG. Several people around internet tried in the past years without success. The only working way is actually to put an image in RAM that will acces a NFS server to get its rootfs and then use the prompt we will get to program the flash memory of the router.
For debricking and follow this HOWTO, you need to have a JTAG interface compatible with OpenOCD. Personnally, I used a BlackHawk USB100v2 also named XDS100V2 from TI.
You also need a USB to serial-TTL 3V3 converter. Connect it to J5 on the WRT350nV2 mainboard. The pinout is as follow :
- VCC
- RX
- TX
- GND
Here is the step by step HOWTO for debricking that router using JTAG :
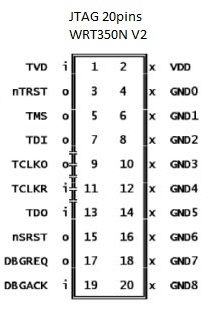
- Open the bricked WRT350NV2 and populate the connector J4 using a SMT 2.54mm header 20 pins. Here it is the pinout to connect the JTAG flasher :
- Download and uncompress OpenOCD 0.10.0 : http://www.freddiechopin.info/en/download/category/4-openocd
- Download MobaXterm Home Edition and install it : https://mobaxterm.mobatek.net/download.html
- Install the last version of VirtualBox and download Ubuntu 14.04 LTS virtual machine.
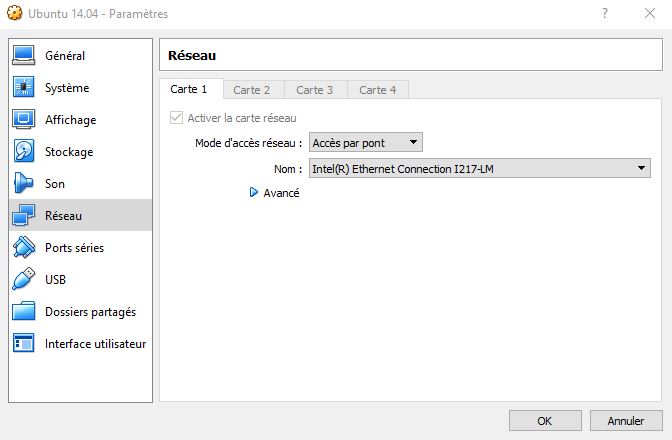
- Before running the Ubuntu VM, make sure that it is configured for using the network interface through a bridge :
- In the VM we need to get a working NFS and a DHCP servers. For that, launch the VM and install the following packages :
sudo apt-get install nfs-kernel-server
sudo apt-get install isc-dhcp-server - Connect your PC Ethernet interface directly to the port 4 of the WRT350NV2.
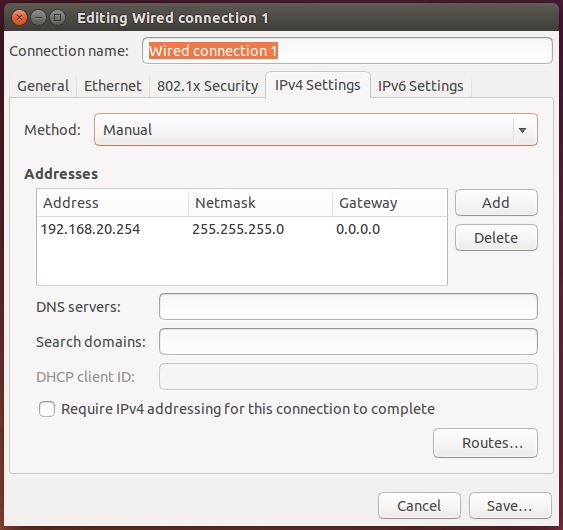
- Change the ethernet interface IP address of the VM to a manual address like 192.168.20.254.
- Now let’s configure the DHCP server. In my example, the VM is the DHCP server with IP 192.168.20.254, the windows OS host is at IP 192.168.20.10 (the first free value) and the the router WRT350NV2 will get the following address which is 192.168.20.11. To do that configure the file /etc/dhcp/dhcpd.conf with the next lines :
ddns-update-style none;
default-lease-time 600;
max-lease-time 7200;
option subnet-mask 255.255.255.0;
option broadcast-address 192.168.20.255;
option routers 192.168.20.254;
option domain-name-servers 192.168.20.254;
option domain-name "mydomain";
log-facility local7;
subnet 192.168.20.0 netmask 255.255.255.0 {
range 192.168.20.10 192.168.20.100;
} - The image we will put in the router’s RAM will access to the NFS server of the VM for getting its rootfs and it should be on the VM disk in a directory named /tftpboot/xxx.xxx.xxx.xxx, where xxx.xxx.xxx.xxx is the IP address provided by the DHCP server. In my case, the IP address the router gets is 192.168.20.11. Let’s configure the NFS server :
- Create the directory /tftpboot/192.168.20.11
- Add the following line in the files /etc/exports :
/tftpboot/192.168.20.11 *(rw,sync,no_subtree_check,no_root_squash) - Update the NFS server with the new settings :
sudo exportfs -ra
sudo service nfs-kernel-server restart - I prepared a RootFS with all binary files from the stock firmware ready to be flashed. Download the file “nfs_rootfs_jtag.tar.gz” which is on the right hand of this page. Uncompress it in the folder /home/osboxes/TEST.
- Add the following line in the files /etc/fstab for mapping the RootFS folder to the directory that is shared through the NFS server :
/home/osboxes/TEST/192.168.20.11 /tftpboot/192.168.20.11 none bind,rw 0 0 - To be sure there will be no access rights problem and as we are in a virtual machine with a closed network, let’s open all rights to everyone in the NFS folder and makes it belonging to root :
sudo chown -R root:root /tftpboot
sudo chmod -R 777 /tftpboot - Restart the VM, log into it and verify that the nfs-kernel-server and the isc-dhcp-server are running :
sudo service --status-all - Verify the NFS shared folder is well mounted :
ll /tftpboot/192.168.20.11 - Now your VM is ready.
- Download the file “zImage_jtag_wrt350n.zip” (many many thanks to DirkNL) which is provided on this page and uncompress the file “zImage.jtag.wrt350n” into the same folder as the openocd.exe (in bin-x64 in my case as I’m using a Win10 64bits).
- In the folder “./scripts/board” in the openOCD directory, create a text file with the following content :
# Linksys WRT350Nv2
# SoC: Marvell Orion 88F5181 with Feroceon CPU (ARMv5TE)
# Documentation at http://www.embeddedarm.com/
# under Support -> Documentation -> Third-Party manuals
# -> MV88F5182 files (sister SoC with SATA)
set CPUTAPID 0x07926041
source [find target/feroceon.cfg]
# use RCLK (adaptive clock speed), fallback 3 MHz = 3000KHz
# (otherwise use "adapter_khz", before 0.5.0 use "jtag_khz", before 0.2.0 use "jtag_speed")
adapter_khz 1000
arm7_9 dcc_downloads enable
arm7_9 fast_memory_access enable
# define NOR flash bank
# (TODO: can not be written to, seems some register values are missing in init)
set _FLASHNAME $_CHIPNAME.flash
flash bank $_FLASHNAME cfi 0xff800000 0x00800000 1 2 $_TARGETNAME jedec_probe
init
ftdi_set_signal PWR_RST 1
jtag arp_init - Now open MobaXterm and start a shell session and go into the openOCD executable folder.
- Connect your JTAG (not on a USB3) and power on your router. Send that command line (change the interface by yours) :
./openocd.exe -f "interface/ftdi/xds100v2.cfg" -f "board/wrt350nv2.cfg" - In my case, the first time I send that commands I always get errors. I send CRTL+C to stop the process and resend the command line and it works.
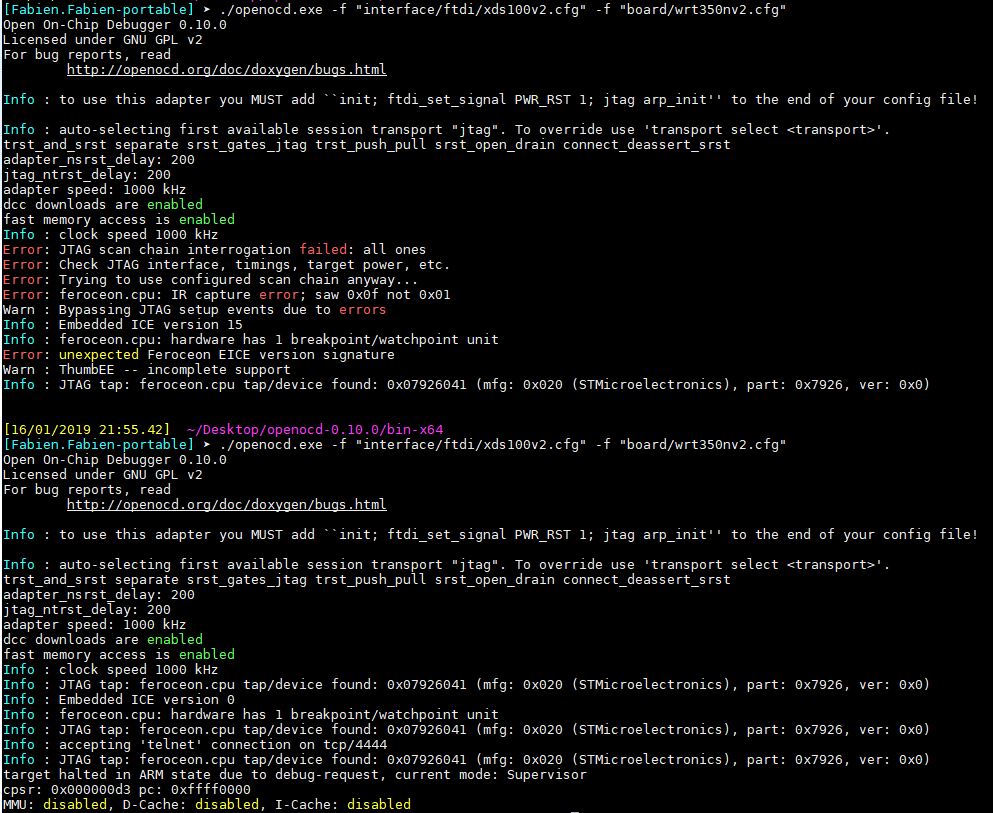
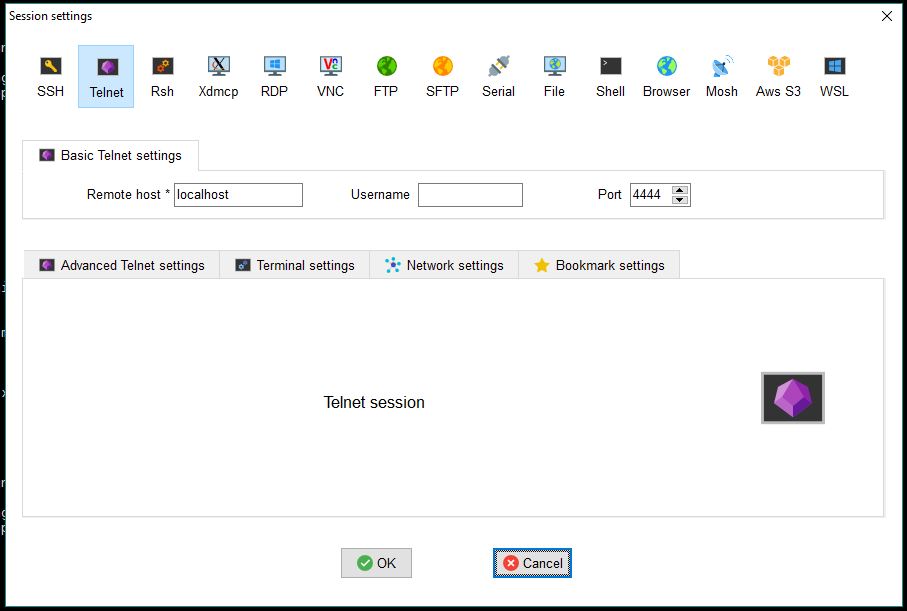
- On MobaXterm, start a Telnet session on localhost and port 4444 in order to connect to OpenOCD command line :
- On MobaXterm, start also a serial session on your USB-Serial converter port at 115200 speed.
- Now, after all this preparing steps, we will send into the WRT350NV2’s RAM the zImage and lets it boot on it. First, we have to reset the router using the OpenOCD terminal for being in a known state :
reset init - Then, send all the following commands (pay attention to replace the AABBCCDDEEFF by the MAC address of the unit written on the label at the bottom) in the OpenOCD terminal for loading the zImage in RAM. Look in the serial terminal in MobaXterm : you should see “01234” and then the router booting from its RAM using the NFS filesystem. Finally, you will have the prompt.
#ram latency settings
feroceon.cpu mww 0xD0001400 0x03148400
feroceon.cpu mww 0xD0001404 0x04041000
feroceon.cpu mww 0xD0001408 0x11602220
feroceon.cpu mww 0xD000140C 0x0000040C
feroceon.cpu mww 0xD0001410 0x00000000
feroceon.cpu mww 0xD0001414 0x00000000
feroceon.cpu mww 0xD0001418 0x00000000
feroceon.cpu mww 0xD000141C 0x00000062
feroceon.cpu mww 0xD0001420 0x00000000
#additional SDRAM settings
feroceon.cpu mww 0xF10014C0 0x071F128A
feroceon.cpu mww 0xF10014C4 0x071F128A
#ram size register settings
feroceon.cpu mww 0xD0001504 0x01FF0001
feroceon.cpu mww 0xD000150C 0x00000000
feroceon.cpu mww 0xD0001510 0x20000000
feroceon.cpu mww 0xD0001514 0x00000000
feroceon.cpu mww 0xD000151C 0x00000000
#ram init
feroceon.cpu mww 0xD0001480 0x00000001
#serial setup
feroceon.cpu mww 0xD001200C 0x83
feroceon.cpu mww 0xD0012000 0x5A
feroceon.cpu mww 0xD001200C 0x03
#serial test
feroceon.cpu mww 0xD0012000 0x30
feroceon.cpu mww 0xD0012000 0x31
feroceon.cpu mww 0xD0012000 0x32
feroceon.cpu mww 0xD0012000 0x33
feroceon.cpu mww 0xD0012000 0x34
#CPU map registers
feroceon.cpu mww 0xD0020060 0x00FF7941
feroceon.cpu mww 0xD0020064 0xF0000000
#cpu pci-e
feroceon.cpu mww 0xD0020100 0x00000003
feroceon.cpu mww 0xD0020104 0x00000000
#interrupt
feroceon.cpu mww 0xD0020204 0x106203C9
#mac (NOTE: use value from label on your device for replacing the AABBCCDDEEFF value)
feroceon.cpu mww 0xD0072418 0xAABBCCDD
feroceon.cpu mww 0xD0072414 0x0000EEFF
#gpio
feroceon.cpu mww 0xD0010100 0x0000006E
feroceon.cpu mww 0xD0010104 0xFFFFF21C
feroceon.cpu mww 0xD0010108 0x00000000
feroceon.cpu mww 0xD001010C 0x00000530
feroceon.cpu mww 0xD0010110 0x0000054E
feroceon.cpu mww 0xD0010114 0x00000591
feroceon.cpu mww 0xD0010118 0x00000000
feroceon.cpu mww 0xD001011C 0x00000010
#PCI-e
feroceon.cpu mww 0xD0041804 0x01FF0001
feroceon.cpu mww 0xD0041808 0x00000000
feroceon.cpu mww 0xD004180C 0x00000000
feroceon.cpu mww 0xD00418F8 0x8000003C
feroceon.cpu mww 0xD00418FC 0x0000010B
#PCI
feroceon.cpu mww 0xD0030D3C 0x00000009
feroceon.cpu mww 0xD0030C00 0x2107E371
feroceon.cpu mww 0xD0030C78 0x8001380C
feroceon.cpu mww 0xD0031D58 0x00000100
feroceon.cpu mww 0xD004 0x3F2A3B0B
#PCI/MPP
feroceon.cpu mww 0xD0031D1C 0x03F3FFFF
#MPP
feroceon.cpu mww 0xD0010000 0x00000003
feroceon.cpu mww 0xD0010004 0x11110010
feroceon.cpu mww 0xD0010050 0x00001111
feroceon.cpu mww 0xD0010008 0x03FF0000
feroceon.cpu mww 0xD0010010 0x10410636
#NAND flash control register
feroceon.cpu mww 0xD00104E8 0xFFFF0000
#register move
feroceon.cpu mww 0xD0020080 0xF1000000
load_image ./zImage.jtag.wrt350n 0x00400000 bin
resume 0x00400000 - On the serial terminal, you will be invited to press “Enter” and then you get the prompt :
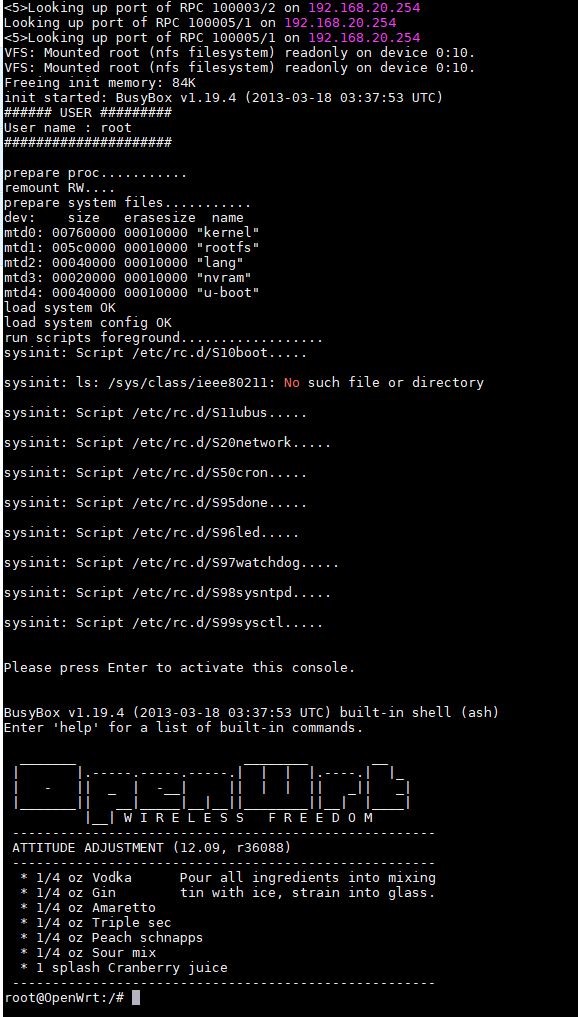
- In the filesystem you use with NFS, I prepared in the folder “/root” everything needed for flashing the flash memory of the router WRT350N V2 with the last stock firmware from Linksys :
- The 4 binary files in the folder “/root/Linksys” for rootfs+kernel, lang, nvram and u-boot partitions.
- Some scripts in “/root” that permits to launch the programming sequence (nothing specially, only “dd” commands with the right mtdblock).
The only thing you have to do before flashing is to modify the file “wrt350_official2.00.20_uboot.bin” in the folder “/root/Linksys” to write the MAC address of your router in it. For doing that use your prefered HEX editor (HxD in my case), and go at the offset 0x3FFA0 to write the 6 bytes written below your router :

- As soon as it is done, you can launch the programming scripts one after the other in the serial terminal (don’t worry if it takes some time without answer in the serial terminal, be patient) :
cd /root
./flash.rootfs
./flash.lang
./flash.nvram
./flash.uboot - Disconnect the JTAG, the serial, power off your router and then power it on : your router is back to life !
- Enjoy !


